Learn how to get started with metadata management and database documentation with Dataedo in a few simple steps.
Introduction
What is Dataedo?
Dataedo is a database documentation tool, which helps you extract the structure form your data sources and then document it – provide information about the meaning, purpose and the structure itself, so that everyone in your organization who works with data understands it.
Key features
Key features you will be working with are:
Metadata connectors – connectors you can use to connect with your data source and extract the data from it. You can find the full list of our connectors here.
Metadata repository – where you store information extracted from your data source with information provided by the users.
Data Dictionary – is the core of the information. It’s the specification of your data - every field, table etc. In your data source.
ERDs - entity relationship diagrams, that you can use to visualise relationships between tables.
Business Glossary (Enterprise) - allows you to create universal vocabulary of business terms with their definitions and mapping to the data.
You can find the full list of features here.
How it works?
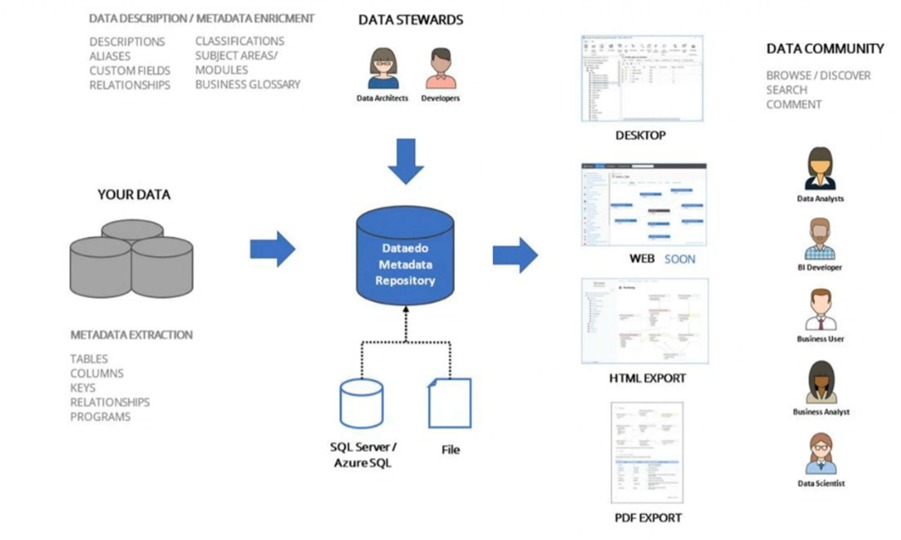
Information about your data is extracted from your data sources through our connectors to the Dataedo Metadata Repository - the central place of our solution’s architecture. It’s a database that holds information extracted from your data sources and information provided by the users (descriptions etc.). It can be hosted as an SQL Server database or AzureSQL (in the cloud). Alternatively, it can be stored as a file, but if you want to build a data catalog used by many people in your organization we recommend the server version.
Our solution serves two types of users:
Data Stewards (Data Architects, Developers) who use editing options of Dataedo and provide additional layer of information on top of the information extracted from your data sources - such as descriptions of the elements, aliases, custom fields. They also explain relationships between entities provide classification (for example for data protection), define subject areas (modules – topics of the data), create Business Glossary and map it to the data dictionary.
Data Community - people, who will be using the documentation created by Data Stewards - all the people in your organization who work with data, such as Data Analysts, BI Developers, Business Users, Business Analysts, Data Scientist. With documentation they are able to easily search and discover data necessary to prepare reports etc.
We have 4 types of interfaces, that allows you to interact with the data and documentation in different ways:
Dataedo Desktop – it’s a Windows Desktop Application that you download & install on your computer. It allows you to set up the Metadata Repository, connect to your data source and feed the data to the repository. This is where Data Stewards are able to provide information about your data. With Dataedo Desktop you can easily export documentation for sharing by:
HTML Export – advised way of sharing the documentation. It creates interactive HTML document which you can put on any web server, so your Data Community has an easy access to data.
PDF Export - the simplest way of exporting and sharing the documentation.
Dataedo Web - a web application hosted in your environment. It allows you to create a live access to your Metada Repository. Right now it allows the Data Community to use advanced search and interactive ER Diagrams and Business Glossary. Soon it will also allow editing descriptions for Data Stewards, and have community features (such as commenting, rating data assets etc.).
Benefits
- Make complex and convoluted designs readable
- Unlock data in your organization
- Get new people on board quicker and with less hustle
- Improve communication between developers, admins, architects and business users
- Facilitate reporting & analytics
- Knowledge says in your organization
Get started with Dataedo
For the start of your journey with Dataedo, we recommend choosing a small part of your database to document (the one that is used the most or executives are talking about), to be able to see & share results quickly and get feedback from your team.
#1 Set up Dataedo
To start working on your documenation, the first thing you need to do is download and install Dataedo on your computer. If you haven’t already, you can start a free trial here to get a trial key.
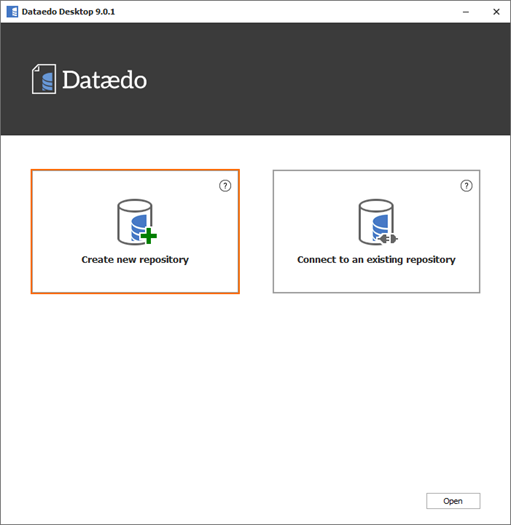
If the installation was successful, run Dataedo. The next step will be creating your firsts repository. To do so, double click on the button Create new repository.
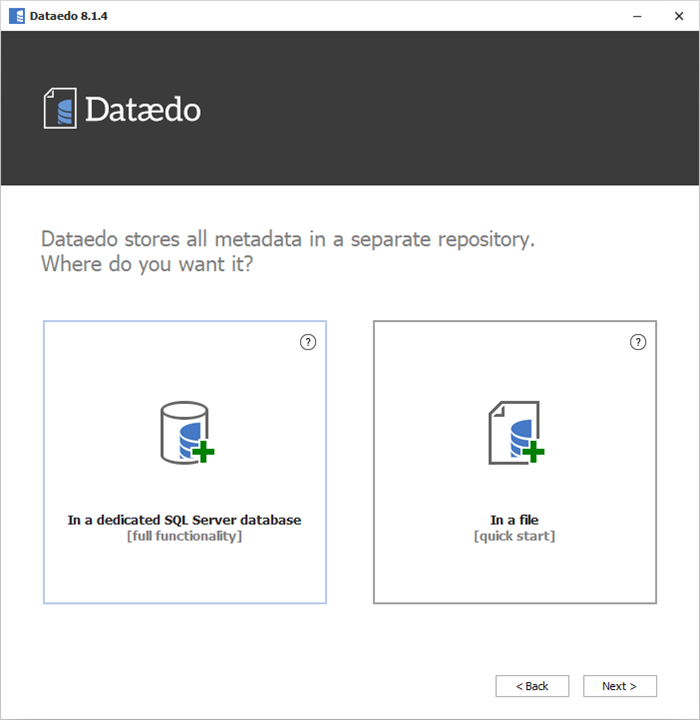
Then choose how you would like to store your Metadata Repository. If you have SQL Server or AzureSQL database, we recommend choosing the first option “In a dedicated SQL Server database” – this will make it easier for other people in your organization to be able to also work on the documentation. If you are not technical, you can ask your Admin to set it up for you. If that’s not possible right now, follow this tutorial to learn how to save your repository in a file.
Now you need to provide connection details for your repository and log in as a user that has 'create any database' rights on the server (sysadmin role, for instance).
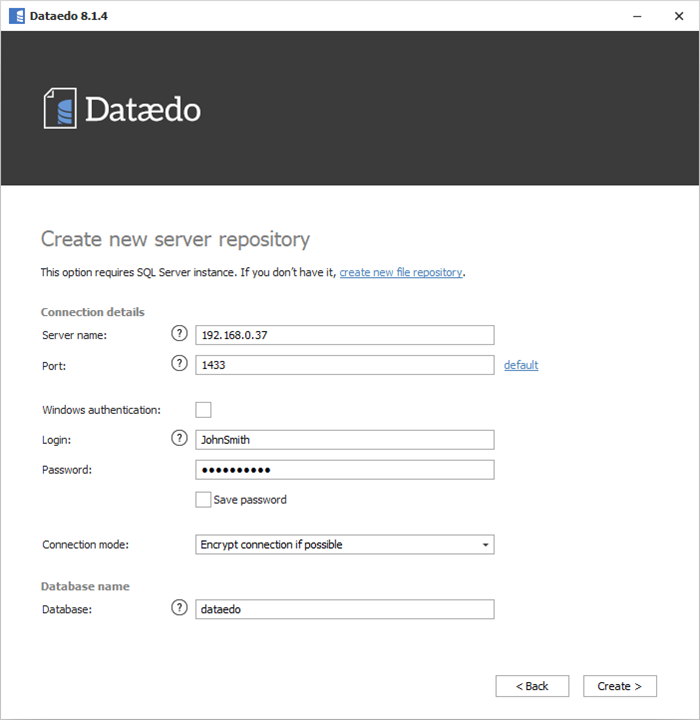
If your connection is established, your permissions sufficient and database with the name provided doesn't exist yet, Dataedo will create a new database and create necessary tables and data.
You may now log into your new repository. Connection details are pre-populated and if you want to connect as the same user just enter a password. If you want to connect and work as a different user, create the new user account with Administration Console.
#2 Import metadata
Now it’s time to import data from your key data sources. We will show you how to do that on the SQL Server with AdventureWorks as sample database. Importing data from other sources is similar – you can find individual tutorials for the most popular data sources below:
- SQL Server
- Azure SQL
- Oracle
- PostgreSQL
- MySQL
- MariaDB
- Amazon Aurora
- Amazon Redshift
- Snowflake
- Google Cloud SQL
All databases compatible with Dataedo can be found here. If your database isn’t supported, you can use ODBC connection.
To import schema of metadata, click Add documentation and Database connection.

Then you need to provide connection details. For example, select "SQL Server" from DBMS dropdown lists. Then enter the following details:
- Server Name – name/IP of your server/host,
- Authentication – Choose SQL Server Authentication to log in as SQL user credentials, or Windows Authentications if Windows or domain user credentials are used to logging.
- User – username (required for SQL Server Autenthication)
- Password – password (required for SQL Server Autenthication)
- Save password - optionally, it is possible to save the password so that if the database scheme change, loading changes does not require manual entry.
- Database - name of the database that should be entered or selected from the list (by clicking the [...] button).
Click Connect after filling in all fields.

Once Dataedo successfully connects to your database, you can choose the objects you want to import. If you don't want to import some, simply uncheck them and click Next.
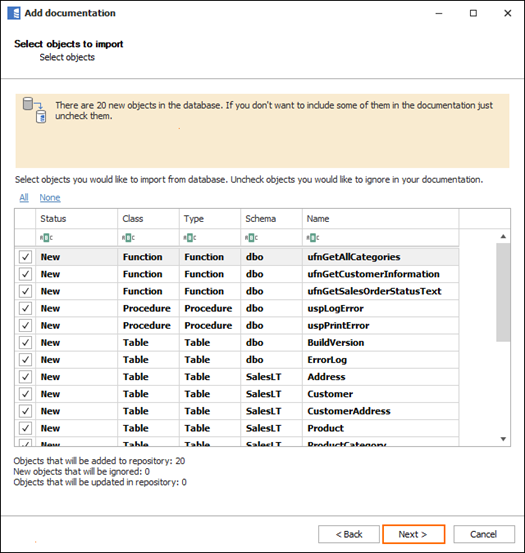
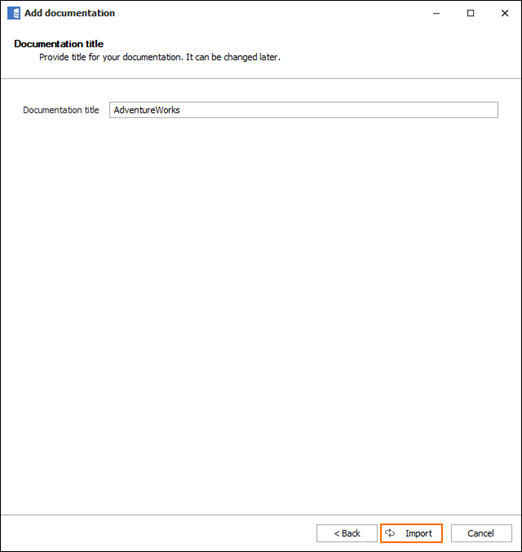
In the next step you can change the name of the added documentation (the name can always be changed in repository explorer). After you click Import button, Dataedo will start to import the schema details. Finish the import by clicking Finish.
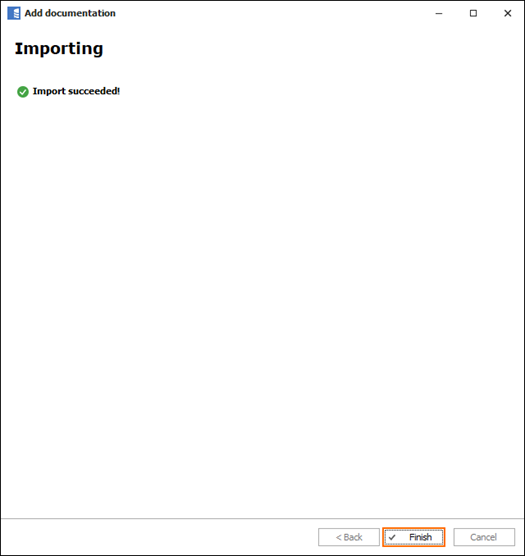
When the import is completed, a new window with success message will appear. To finalize the process click Finish button.
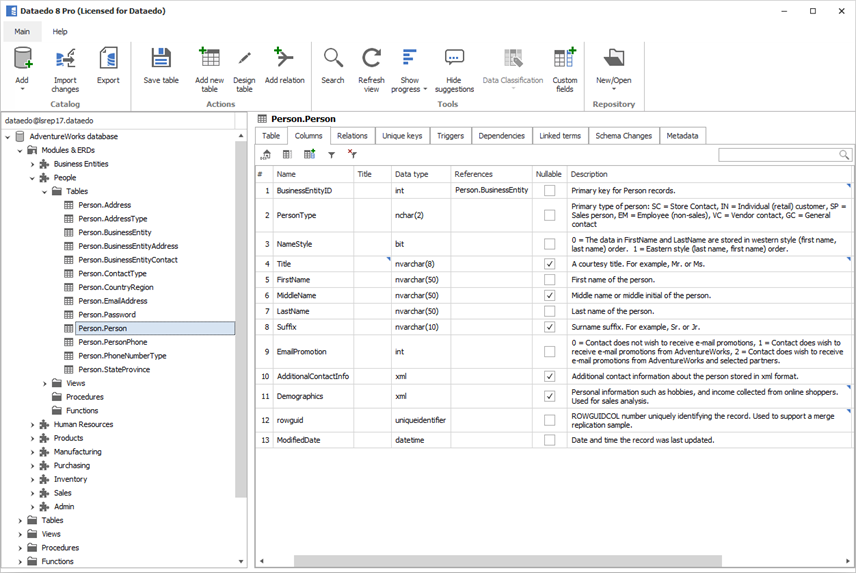
After successfully importing the schema, previously specified name should appear in the ropository explorer. Here you will be able to browse it’s contents.

#3 Create descriptions, aliases & custom fields
Content of some entities such as tables or columns in your database can be obvious, but that’s not always the case. Here’s where descriptions come into play. They can for example explain where the data for particular column comes from and how it’s calculated. To add a description just click on the “Description” field and start typing. You can also add a** title (Alias)** – this is helpful when the name of a table or a column isn’t self-explanatory.
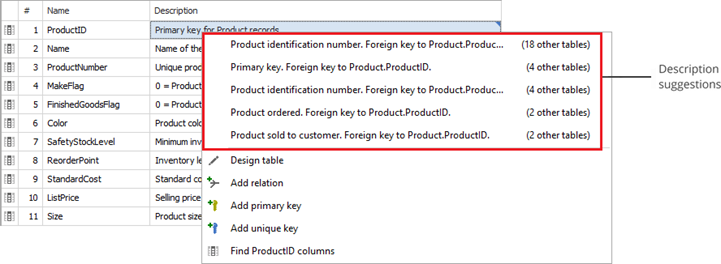
If you already documented some data, you can use description suggestions to speed up your work. To check if there are any, right click on the field.
Dataedo also allows you to create up to 100 custom fields. One of such fields could be a Status or Owner. You can use it to define what is the actual status of a table or column - if it still in use (active) or perhaps it was canceled, and so on. You can define the labels yourself.
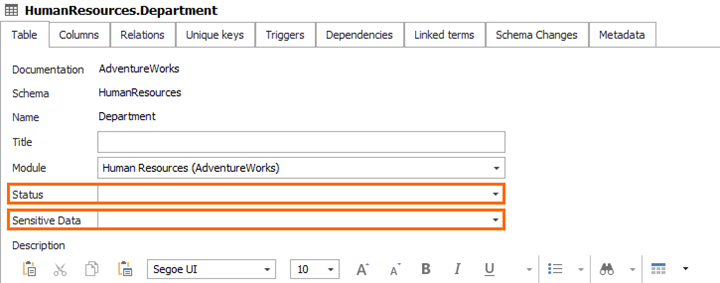
Learn more about creating custom fields.
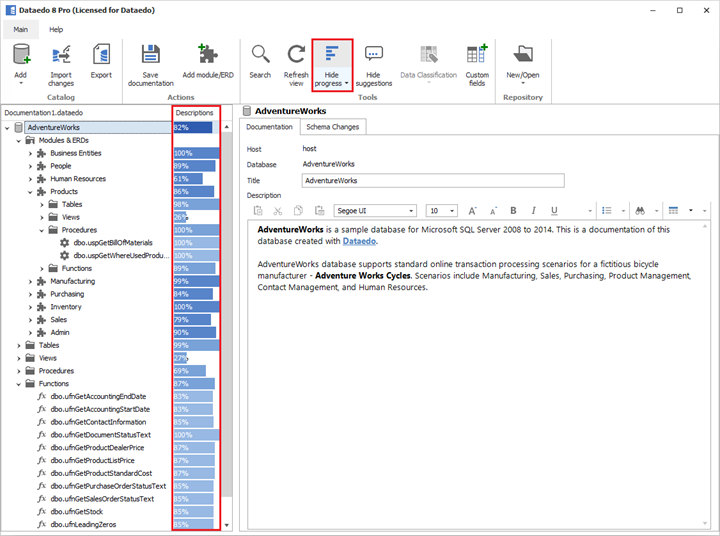
You can also easily track the progress of documentation - i.e. how many description fields are non-empty in particular part of documentation. To enable progress tracking select option from Show progress button on the ribbon.
#4 Create modules & assign tables
Modules are elements exisiting only in Dataedo repository. They are created to organize logically or functionally schema of your database (e.g. for an application, module, report etc.), as well as explain certain topic (e.g. Orders, Customers etc.). The modules can be helpful when:
- You need to qucikly find related objects
- You need to determine what a specific table is responsible for
- You need to establish table relations
- You need to find objects related to specific module or functionality
For each module there is a possibility to add an extensive description. An additional benefit of creating modules is additional chapters when exporting documentation to PDF files.
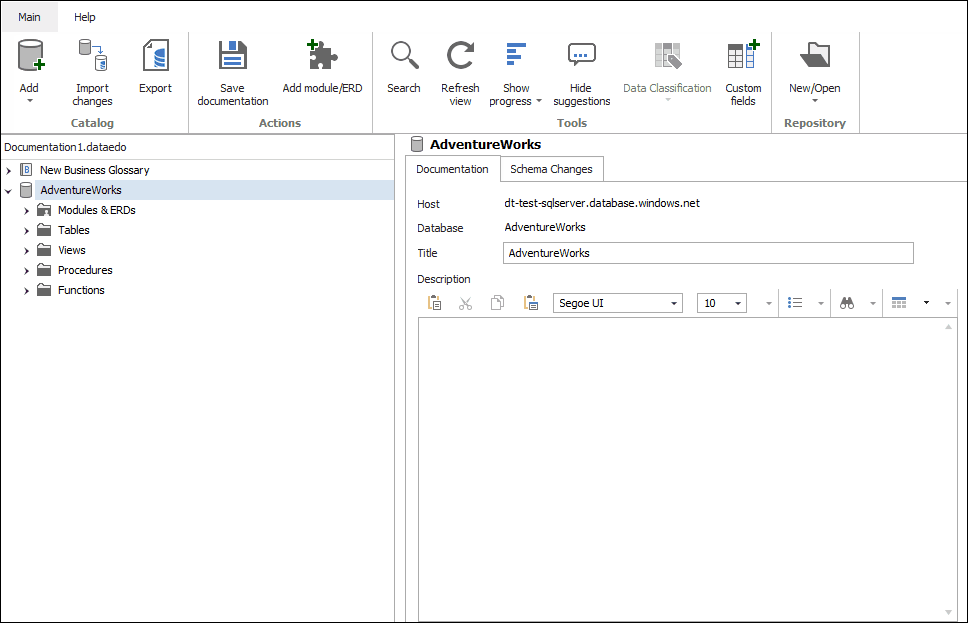
To create a module, select the Modules & ERDs tab in Repository Explorer.
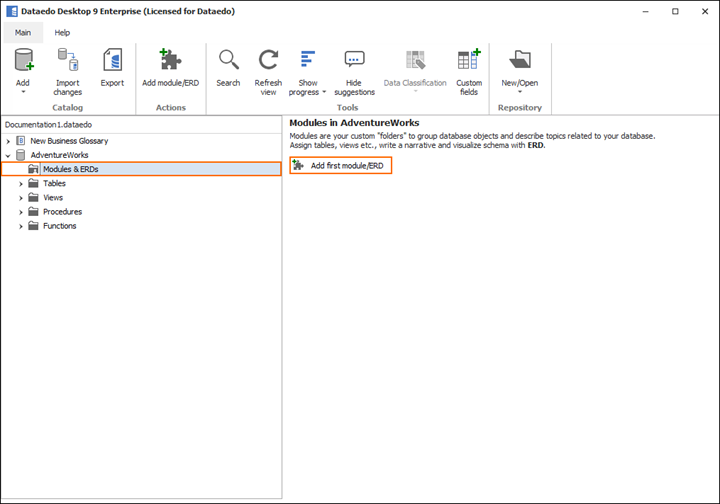
Give it a name and add a title & description. After module is created and you have assigned tables to it (described below), you will be able to browse the list of assigned entities as well as ERD (Described in more detail in the next section).
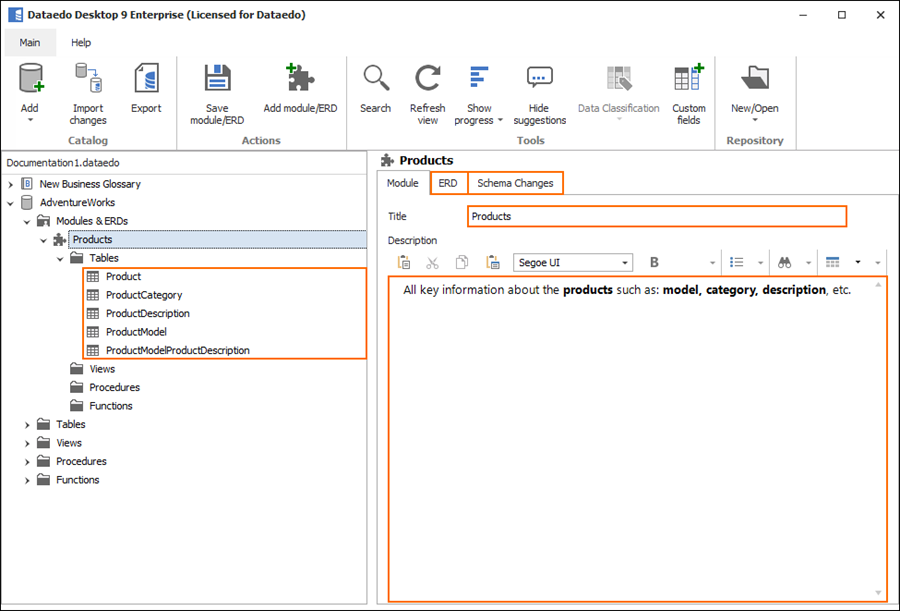
To assign tables to a specific module, simply select the desired tables and drag them to the previously created module.
#5 Create ER Diagrams
Entity Relationship Diagrams (also called ER Diagrams or ERD) are types of flowchart that illustrates how entities relate to each other within a system. They are helpful when visualization of a database schemas is needed.
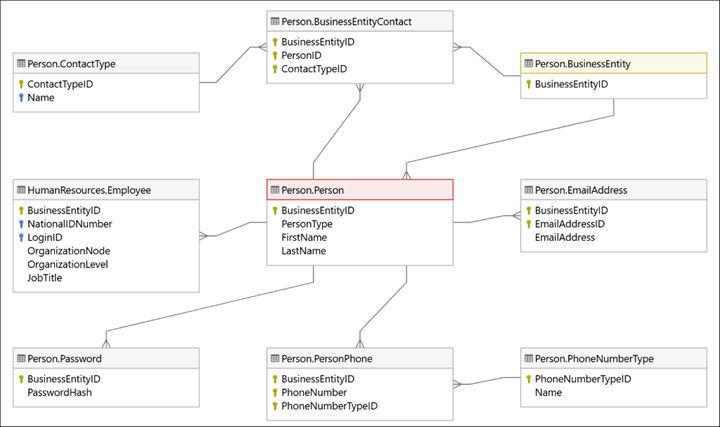
Diagrams in Dataedo are stored in the modules that were described in the previous section.
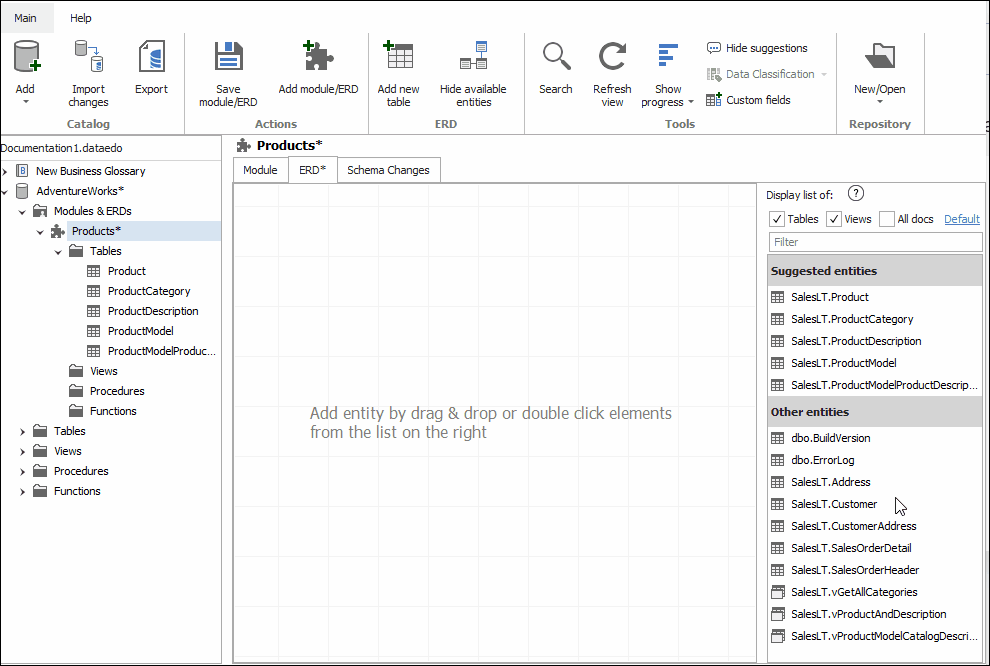
Once a module has been created and the corresponding objects have been assigned to it, we can start creating an ER diagram. To do so, after selecting appropriate module, go to the ERD tab.
The displayed window contains diagram panel and a list of available entities. The list contains objects assigned to a specific module as well as objects associated with the selected entities. You can also use filter filed to find table by its name.
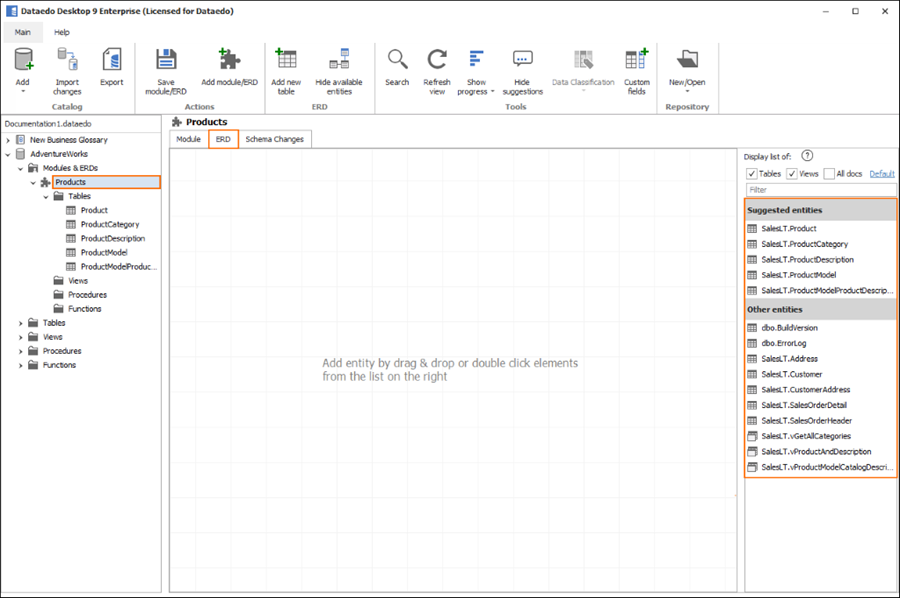
To add objects from the right list, simply double click on it or drag & drop.
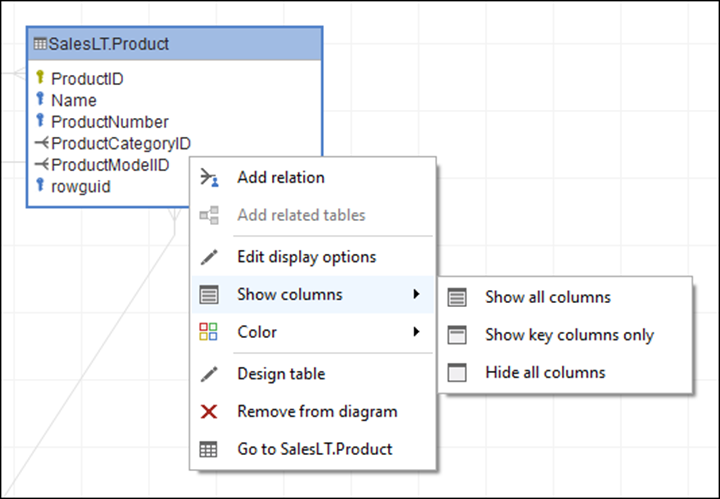
By default, only key columns are included in the ER diagram. However, it is possible to choose the specific columns we want to include in the diagram. Simply right-click the selected object and select one of the options
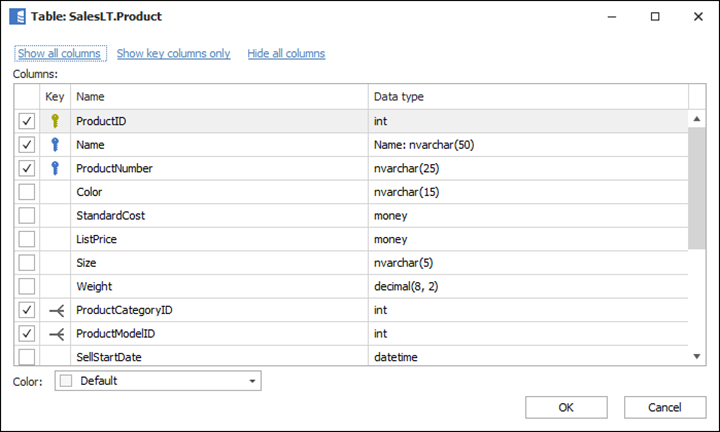
It is also possible to select specific columns to display by double-clicking the entity. In displayed window you can check/uncheck the corresponding columns.
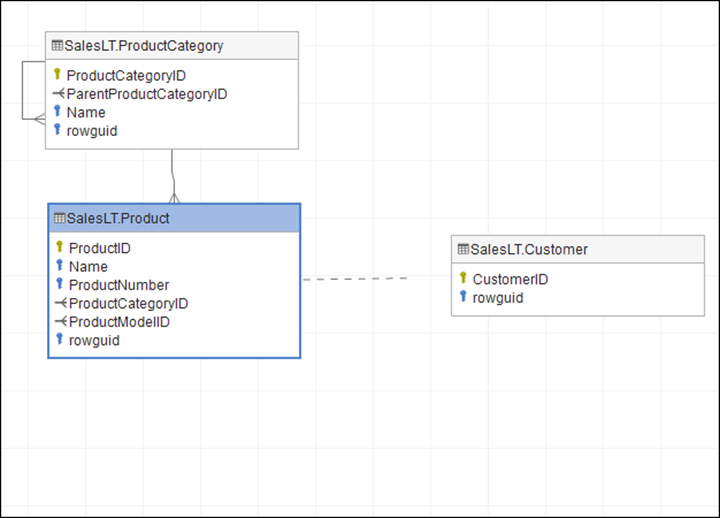
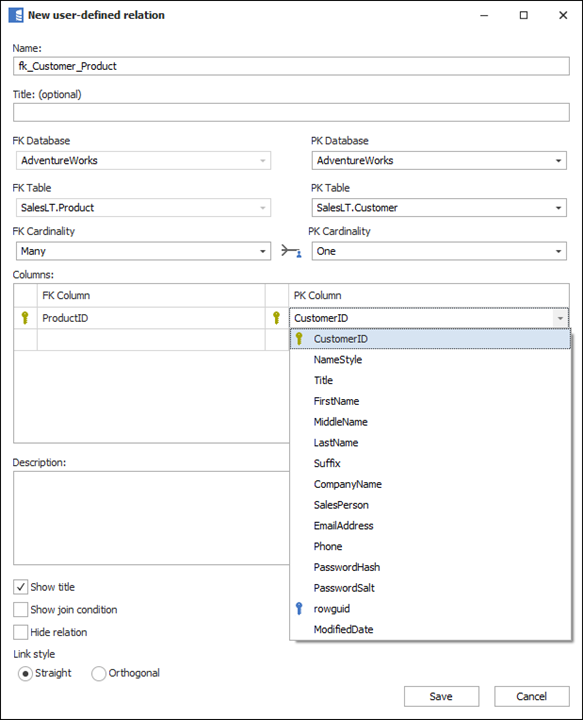
A common problem when processing database diagrams are the missing relationships between entities. One of the key benefits of ERDs in Dataedo is the ability to supplement table joins that do not have foreign keys defined in the database. It is important to note that the created relationship will only appear in Dataedo repositories, without any impact on the source database.
To define new relationship right-click child table, choose Add relation.
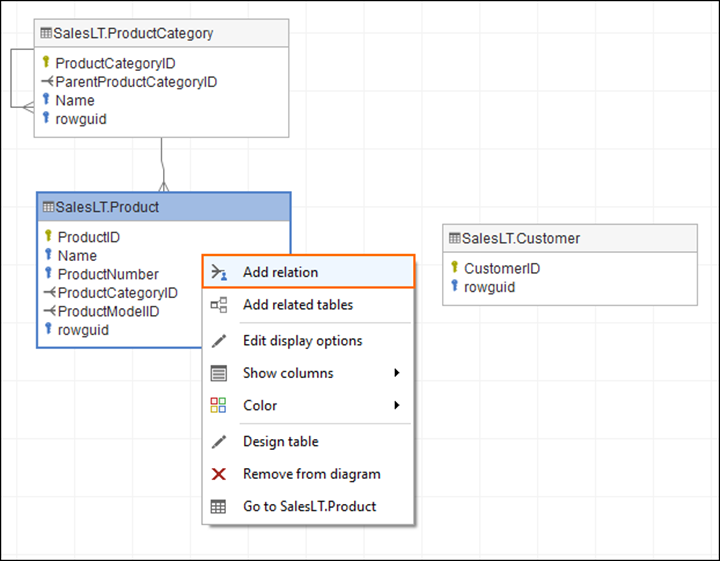
Then, drag link to parent table and left-click.
A new window will appear in which you need to define the relationship details.
Manually added relations are displayed on the panel diagram as dotted line.
The modules and ERDs can contain objects from different databases and even from different data management systems.
When generating diagrams containing a large number of objects, numerous relations can be unclear. To display the most important links, Dataedo gives the possibility to hide unnecessary relations. To do so, select the link, right click and choose Hide relation.

#6 Export & share documentation
Now that your documentation is ready (or just a sample part of it), it’s time to share it with your Data Community (members of your organization working with data). One of the key features of Dataedo is the ability to export the repository objects to a comfortable and interactive format as HTML.
To do so, click Export button on the ribbon.

Choose HTML Basic or HTML Plus format (available for licensed users) and click Next.
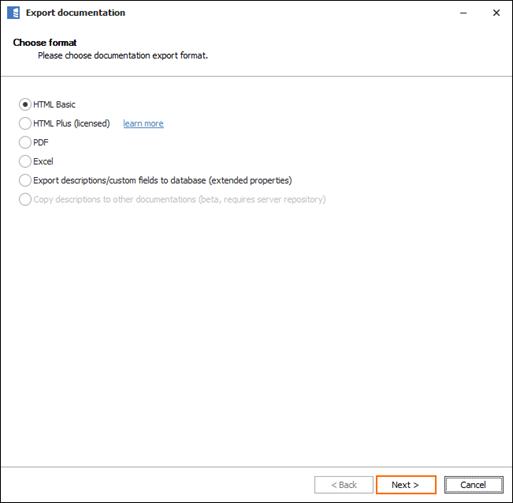
Choose document template and click Next. If no custom template has been created, only default one will be visible.

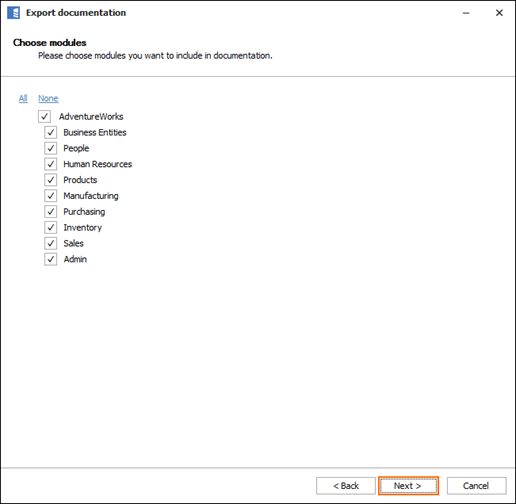
Choose modules to be included in the documentation. Then click Next.
Choose type of objects to be included in the documentation. Then click Next.

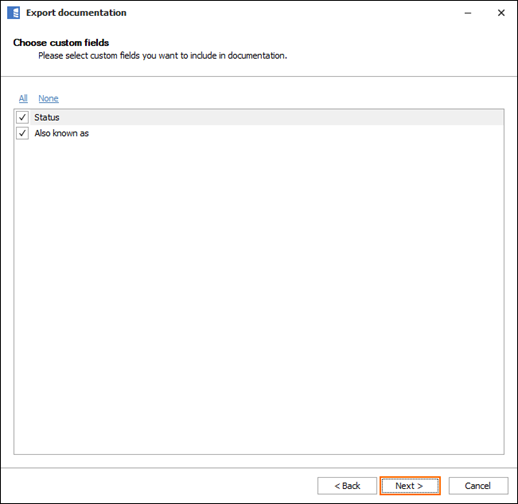
Choose custom fields to be included in the documentation. Then click Next.
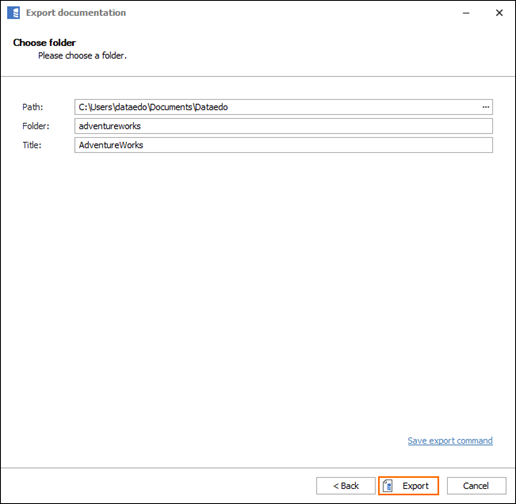
Enter the path for the source folder, as well as its name and title of the documentation and finish by pressing the Export button.
After the export is finished, you will be prompted to open generated file. This is how exported documentation in HTML format looks like:

Documentation in this format can be easily shared with other members. The generated source files can be placed in a shared folder or hosted in any web server like Amazon.
You can also automatically generate documentation by creating scheduled HTML export. This will ensure that the documentation is always up-to-date. You can use Windows Task Scheduler for this purpose.
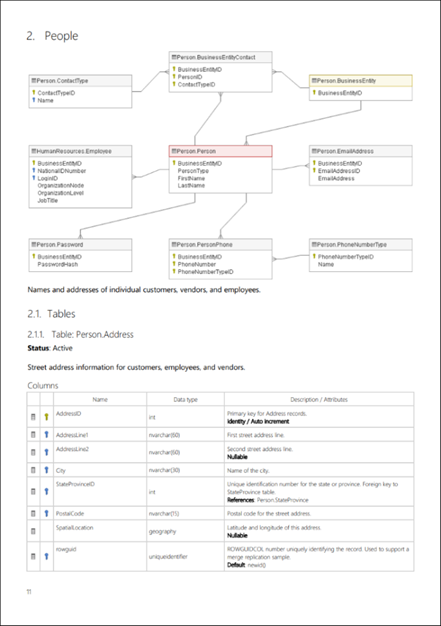
The documentation can also be exported to PDF format. The export process is similar to HTML. Just like there, you can choose modules, object types and custom fileds. There is a possible to select printer friendly template. Below you will find an example of how the PDF documentation looks like.
What to do next?
#7 Start sharing tribal knowledge
Invite your colleagues to take their own trials so that they can help you with documenting the tribal knowledge about the data of your company. To be able to cooperate, share your Metadata Repository.
#8 Share your repository
If you want to work on a documentation with your colleagues, you need to share with them the location of your Metadata Repository.
In general, the Dataedo repository is a plain documented and open SQL Server database implemented in your environment. We do not use cloud solutions, so the repository is embedded in an environment that you have total control over. It is as secure as you make it.
#9 Organize a presentation
When you see how Dataedo can improve the performance of your team organize a presentation and invite your boss!
Need help?
If you need help at any point, you might find these resources helpful:
You can also drop us a line at [email protected].
Take building a Data Community one step further
To create live access to your Metada Repository for your Data Community, you should set up Dataedo Web as well. It will allow your colleagues to be able to efficiently discover, learn, and explore your data with advanced search and interactive ERDs & Business Glossary.

You can find the installation instruction here.


 Anna Sztabkowska
.png)